Requirements[ | ]
You will need the Squad SDK and a properly created Squad Mod as detailed in Creating a Mod.
Pre-Release Checklist[ | ]
Note: The following items are numbered so you can keep track of where you are in this process, and do not necessarily need to be done in the published order.
Maps[ | ]
- Ensure all assets required for your map are stored in your
Squad\Squad\Plugins\Mods\<mod_name>\Content\folder. Anything not in this folder will not be shipped! - Make sure your map has a properly created Minimap.
- Your map must have the required actors for the gamemode you are targeting.
- Check all main base actors to ensure they are set to the correct Team ID.
COOKING, Packaging & Publishing[ | ]
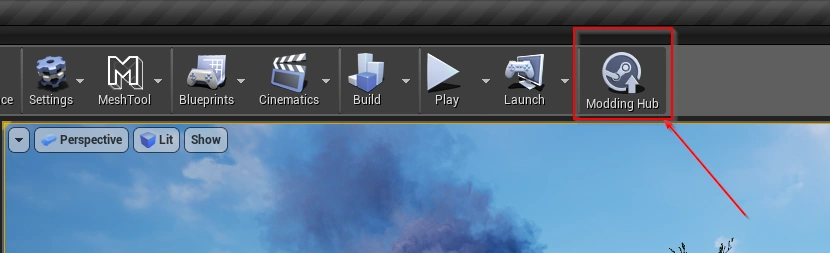
- Once you have completed the necessary pre-release steps, left click on the "Modding Hub" button at the top right of the Squad SDK, then left click on "Load & Edit" button. Search the *.mi File in your Mod Folder that you Created when you made the mod, select and Load the File.
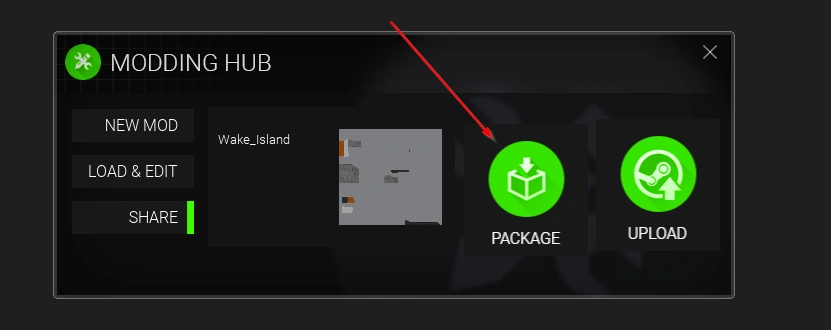
- After you Loaded the *.mi File click on the Share Button in the Modding HUB.Here you will find the package button. If you are ready and your Mod is set up right you can click the "Package" button to start the "Cooking Process". Be aware that if you want to Cook for Linux aswell you need to read the "Packaging Linux" part on this Page first. Cooking of your mod can take anywhere from 5 Minutes to 3 Hours or more depending on the Size of your Mod.
- When the "Cooking" Process is done the Unreal Output Log will state: "Modding shuffle completed successfully!"
- Close the Modding Hub.
- Open the Modding Hub again and go to "Load & Edit" again, now search for the "Cooked" Folder within your Mod Folder and Load the *.mi File inside the Cookek Mod Folder
<YourMod>\Cooked\<YourMod>\<ModName.mi>\ - Open the Steam Client on your PC make sure you are online and logged in.
- Click on Share in the Modding Hub and then Click on Upload. The Upload to the Steam Workshop will begin.
- After the Upload is completed you can Edit the Mod Page in the Steam Workshop and change its visibility Settings.
Packaging Linux[ | ]
To package your mod for LInux you will have to install the UE4 Linux toolchain.
https://docs.unrealengine.com/en-US/Platforms/Linux/GettingStarted/index.html
Check the current UE4 version (Window -> About UE4 Editor) and download the toolchain matching your Squad SDK version.
Make sure the <SquadSDK>/Squad/Config/DefaultEngine.ini contains the configuaration lines mentioned on the doc. These will likely be already included so Ctrl+F and look for the [/Script/LinuxTargetPlatform.LinuxTargetSettings. Make sure TargetArchitecture is set to X86_64UnknownLinuxGnu.
When you package your Mod it will say 'Windows & Linux', also you will see a LinuxServer folder next to the WindowsNoEditor folder in your packaging directory. This will double your build time as it creates two versions. * also will flush your shaders first time you build both.
CAUTION[ | ]
If your computer hardware only just meets the "Minimum requirements" to run the SDK, you may experience crashes and "BUILD FAILED" errors. If you only have 8GB of RAM, close any programs that hog RAM; Discord, Steam, Web Browsers, etc. If not, the SDK will throw 'Fatal Errors' due to lack of RAM and force quit/crash itself. These errors and crashes can happen at any time during the packaging process.
Common mistakes[ | ]
Common mistakes that new modders make.
- Don't package your mod within same folder or directory.
- When you load the SDK and press 'Load Mod' then you package the mod, it won't package the mod correctly. You have to load the map first then package the mod.
- Test your map, don't upload to the Workshop immediately. Once your mod is packaged, test your map at the 'Shooting Range' in-game (follow these steps via 'Downloading a Mod (Local)' & 'Playing a Mod') and see if the mod works first. Test the spawns, vehicles and any other assets in your map. If it doesn't work, fix it and test again. If it does work, you can then open up the SDK again, share the mod to the Workshop.
- If you recive an Error on uploading like:
Upload Failed - Failed to read preview file or get Workshop info...this can be caused by on of the following reasons:- Your Preview Image is larger then 1 Megabyte
- The Mod ID inside of your
<modname>.miFile is wrong or not available anymore on the Steam Workshop, this happens if you Upload a Mod, delet it on the Workshop and want to reupload it again using the Same ID - You are trying to Upload a Mod using the wrong
<modname>.miFile, you shoud always use the one that is inside the Cooked Folder like explained in "Cooking, Packaging & Publishing - Point 5"
Publishing to Steam Workshop[ | ]
First, make sure you are logged into the Steam client on the same computer as your Squad SDK. The user you are logged in as will be the owner of the steam mod. Click on the "Share Mod" button at the top right of the Squad SDK, then left click on the "Upload to Steam Workshop" button.
Modding ChangeLog[ | ]
This is the changelog for your mod. For your first upload, a simple Initial Commit message is appropriate. For future updates, please try to follow the guidelines as listed here and along with following the Steam text formatting to make changelogs presentable.
Once you have clicked "Continue", a progress bar will appear. When you see "Upload Complete.", it is safe to close the "Create Squad Mod" window. The mod will appear under your Workshop Files in Steam.